SC-901 MANUAL
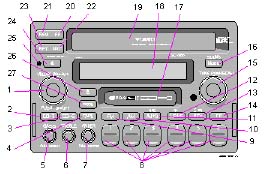
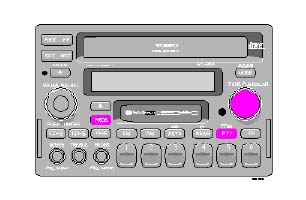
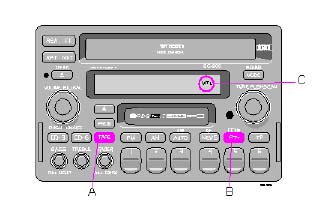
1. On/off (press)
· Volume (turn)
· Balance (pull out and turn)
2. CD player - on/off
3. CD mode selector - on/off
4. Cassette deck - on/off
5. Bass control
· Volume control - sound effects (pull and turn)
6. Treble control
7. Balance control front/rear (fader)
· Volume control - center speaker (pull and turn)
8. Preset buttons
· CD 3 disc selector 1-3
· CD 6 disc selector 1-6
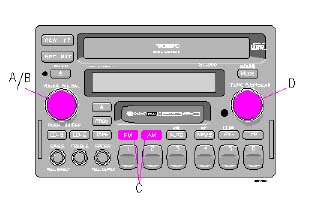
9. Waveband selector (FM)
10. Waveband selector (AM)
11. Autostore memory
· CD - random play
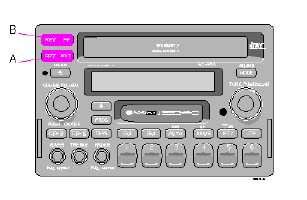
12. News
· Radio text
13. Program type selector
· Dolby B noise reduction
14. Traffic information selector
15. Manual tuning knob
· Track selector - CD
· Scanning
16. Pro Logic Surround Sound
17. Cassette slot
18. Display
19. CD slot
20. Fast forward
· CD - forward search
· Tape - forward search
· Radio - frequency up
21. Fast rewind
· CD - backwards search
· Tape - backwards search
· Radio - frequency down
22. CD - next track
· Tape - next track
· Radio - next station (seek up)
23. CD - repeat previous track
· Tape - repeat previous track
· Radio - next station (seek down)
24. CD - open
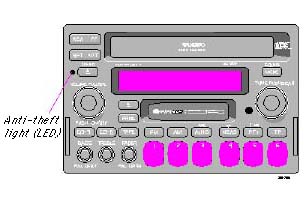
25. Anti-Theft indicator
· CD - warning indicator
26. Cassette eject
27. PROG - reversing the tape

The radio features anti-theft circuitry. If the set is removed from the vehicle or if the battery power is disconnected, a special code must be entered to enable operation of the set.
Refer to the radio code card supplied with your vehicle or ask your dealer for the correct code.
When the car is parked with the ignition key removed, the anti-theft LED will flash.
After installation or when power has been disconnected, `CODE' appears in the display when the set is switched on.
Enter the 4-digit code using the preset buttons. If the correct code is entered, the set is ready to use.
If you enter an incorrect code, you must enter the correct code again from the beginning.
If an incorrect code has been entered, `CODE Repeat' is displayed. Enter the correct code. After three unsuccessful coding attempts, the set will lock and remain locked for two hours. `System Off' appears in the display.
During this waiting period:
· the battery must be connected
· the ignition key must be turned to position I
· the unit must be turned on
Make sure the headlights are turned off to help prevent battery drain.
Enter the correct code after the two hours
have elapsed.
Press the button to switch the radio on/off.
Turn this knob clocKWise to increase the volume. The volume control is electronic and has no stop point.
Press the "FM" or "AM" button to select the waveband you require. The name of the station and the waveband will appear in the display.
NOTE: There are three FM bands and one AM band. This allows you to store 3 x 6 FM stations and 6 AM stations. By pressing the FM button repeatedly you can switch between FM 1, FM 2 and FM 3.
Turn this knob clocKWise to select higher frequencies and counterclocKWise for
lower frequencies. Stored frequencies appear in
the display.
Please note that this function will not interfere with pre-stored stations on buttons 1-6.
This function automatically seeks and stores up to 10 strong AM or FM stations in a separate memory. This is especially useful when travelling in areas where radio stations are unfamiliar.
1. Press and hold the `AUTO' button for at least one second. A number of strong stations (max. 10) on the chosen waveband are now automatically stored in the memory. An `A' now appears to the right in the display. If there are no sufficiently strong signals, `No Station' is displayed.
2. Press the `AUTO' button (for less than one second) if you want to change to one of the other auto-stored stations. A new auto-stored station will be selected each time the button is pressed.
1. Tune to the desired frequency.
2. Press a preset button (the audio will cut out) and keep it pressed until the audio comes on again (approximately two seconds).
3. The frequency is now stored on this preset button.
To select a preprogramed radio program, press the appropriate preset button. The stored
program will appear in the display.
Adjust the bass by pressing the button to extend the control and then turning it to the left (less bass) or to the right (more bass). A "detent" indicates "equalized" bass. Press the button back in when you have set the level.
Adjust the treble by pressing the button to extend the control and then turning it to the left (less treble) or to the right (more treble). A "detent" indicates "equalized" treble. Press the button back in when you have set the level.
Adjust front/rear speaker balance by pressing the button to extend the control and then turning it to the left (more sound from the front speakers) or to the right (more sound from the rear speakers). A "detent" indicates "equalized" balance. Press the button back in when you have set the level.
Pull out the `volume' button and turn clockwise/counterclockwise to adjust
the balance between the right/left speakers. The balance is shown in the display.
The SC-901 radio is equipped with an advanced system allowing information from broadcasters to be transmitted inaudibly together with the audio signal. This information is then decoded by the SC-901 and made available for several new and unique features. The RDS or Radio Data System operates in the FM band only, and the information transmitted is supplied by participating broadcasters. Volvo has no control over the accuracy of the data or information.
Volvo was among the first to pioneer this technology throughout Europe and it is slowly making its way to North America. Coverage by local broadcasters may be limited at this time, but as the technology and benefits grow, you will find the SC-901 radio ready to take advantage of this system.
This feature may not apply in your area.
If you tune into a station using RDS, the frequency is displayed followed by the name of the station in letters. The AF function ensures that the radio automatically tunes into the most powerful transmitter for the selected program.
Keep the FM button pressed down for at least two seconds. `AF Switch OFF' appears in the display for two seconds. If you want to switch on the AF function, press the FM button for less than one second. `AF Switch ON' then appears in the display.
`AF Switch ON'- Automatic station tracking is activated
`AF Switch OFF'- Automatic station tracking is deactivated
Press the left side of the station seek button to seek for lower frequencies and the right side for higher frequencies. The radio seeks the next audible station and stops there. Press the button again to continue searching.
If the TP button is depressed, the station seek function will only seek stations which broadcast this particular type of program.
Press the button to switch off this function.
Press this button to listen to each station for
8 seconds. If the unit is in tape or CD mode, each track will play for ten seconds.
This feature may not apply in your area and only functions with FM broadcasts.
By pressing the TP button, RDS stations broadcasting traffic information can be heard. `TP' is displayed when this function is switched on. If the unit is in tape or CD mode when the radio receives traffic information, the respective function will be interrupted and the announcement is received at the volume selected for traffic information.
As soon as the announcement is over, the previous volume will be restored and the tape or CD will start to play again.
· Traffic information can only be received when TP is displayed.
· If TP is flashing, it means that either no
traffic information is being broadcast by
the current transmitter or the signal is
too weak.
After approximately 70 seconds, an audible signal will be heard, indicating
that you should change to a stronger TP transmitter. To turn off this signal:
- Turn the radio off
- Press and hold down the TP button and turn the radio on. By pressing the TP button again, you can turn the TP alarm on or off.
The radio will function normally again after 5 seconds.
· Press the TP button again if you want
to stop listening to a traffic announcement.
This feature may not apply in your area and only functions with FM broadcasts.
Press the NEWS button to seek a station broadcasting news programs.
The `PTY' function enables you to select different types of program. If you want to search for a specific program type:
1. Press the PTY button for less than 1 second. The program type of the currently selected radio station will be displayed.
2. By turning the manual tuning knob, it is possible to scroll through the different program types.
3. When you have found a program type you want to select, press the manual tuning knob to begin the search. During the search, the chosen program type will flash in the display.
4. If the radio finds a station of the selected program type, it will tune in this station and the station's name will appear in the display. If no station with the selected program type is found, `No PTY' will appear in the display for five seconds and the radio will revert to the previous station.
Program types are factory-preset as follows:
Button 1 - Top 40
Button 2 - Classical
Button 3 - News
Button 4 - Rock
Button 5 - R&B
Button 6 - Country
These settings can be reprogrammed according to your preferences. To change the default settings:
1. Press the PTY button for less than 1 second to enter the PTY preset programming mode.
2. Turn the manual tuning knob to display different program types.
3. Press one of the preset buttons for at least 2 seconds to store your choice of program type on that button.
Press one of the preset buttons to select a program type. The program type stored on that button will be displayed and a station broadcasting that type of program will be selected. Press the same button again to select a new station broadcasting the same type of program.
If you change the volume during a traffic announcement, this volume setting will be stored automatically and used for future traffic information.
The Auto Volume function adjusts both the volume and frequency response according to vehicle speed.
To enable/disable (switch on or off) this function:
· Hold down preset button 1 while switching on the radio. The current setting (ON or OFF) will be displayed.
· Press preset button 1 to toggle
between ON and OFF. After five seconds, the display will return to normal and
your selection (ON or OFF) will be stored.
Certain RDS stations broadcast general information on programs, music, weather, etc. in text form.
This information can be displayed by pressing the NEWS button for approximately 2 seconds. If no text information is available, "No radio text" will be displayed.
WARNING! |
Insert the cassette with the open side to the right (side 1 or A upwards). When the cassette is inserted, the radio is automatically switched off and the cassette will start to play. `Tape side A' or `Tape side B' will appear in the display to indicate which side of the tape is being played. When one side of the tape has been played, the unit will automatically play the other side (auto-reverse). The cassette can be ejected up to five minutes after the key has been taken out of the ignition.
Press this button if you want to play the other side of the tape. The side of the tape being played will be displayed.
The tape is advanced with `FF' and rewound with `REW'. `FF' (fast forward) or `REW' (rewind) appear in the display when fast winding. Fast winding can be stopped by pressing the button again.
If you press the `NXT' button, the tape will automatically advance to the next track. There must be a gap (no audio sound) of approx. 5 seconds between songs for this function to operate.
If you press the `RPT' button, the tape will automatically rewind to the previous track. There must be a gap (no audio sound) of approx. 5 seconds between songs for this function to operate.
`NXT' and `RPT' flash when the tape is either fast forwarding or rewinding.
NOTE: This radio is equipped with background FF/REW and NXT/RPT functions. This
means that you can listen to the radio or a CD by selecting either of these modes while a tape is
being wound.
If you press the `TAPE' button, the tape will stop, the sound will cut off and `PAUSE' will appear in the display. Press the `TAPE' button to restart the tape.
Press this button if you are playing a tape which has been recorded with the Dolby
B noise reduction system. The Dolby symbol ![]() appears in the display.
appears in the display.
If you are playing a metal tape (CrO2) `MTL' appears in the display.
If you press this button, the tape will stop and the cassette will be ejected. The radio, CD 3 player or CD 6 changer will be automatically switched on depending on which mode was used before the tape was played.
Press the FM, AM or AUTO button to return to the radio mode. The radio will then be switched on without the cassette being ejected.
If the cassette deck has been switched off, but the cassette has not been ejected, you can return to tape mode by pressing the `TAPE' button.
If the CD player has been switched off, but the cartridge has not been ejected, you can return to the CD 3 mode by pressing the CD 3 button
If the CD 6 changer has been switched off, you can return to the CD 6 changer mode by
pressing the CD 6 button.
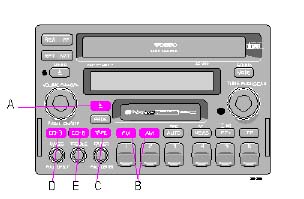
When you insert a cartridge, the unit will automatically switch modes and the CD 3 will start playing. A cartridge can be inserted even if the unit is switched off. To operate:
· Insert the discs into the cartridge, label side up.
· Insert the cartridge in the CD 3 slot, in the direction indicated by the arrow on the top side of the cartridge.
· Eject the cartridge by pressing button C.
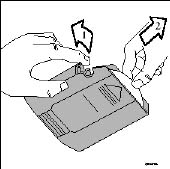
· Remove the discs from the cartridge by pulling the lock tab for the disc you wish to remove (1). Carefully pull the disc out of the cartridge (2).
Press the CD 3 button to activate the CD player. The last track to be played will start playing. If there is no disc in the cartridge, the cartridge will automatically be ejected. Choose disc 1, 2 or 3 with the preselect buttons 1-3.
If you press this button, the CD 3 player will stop and the cartridge will be ejected. The radio, cassette deck or CD 6 changer will automatically be switched back on, depending on which function was used last.
NOTE: Do not pull the cartridge while it is
in operation, as this may damage the mechanism.
Press the `FF' or `REW' buttons to search within a track. While the button is pressed, the playing time for this track is displayed.
Press `NXT' to move forward to the next track, `RPT' to repeat the previous track or turn the manual tuning knob. The selected disc number and track number will appear in the display.
When the `FF' or `REW' buttons are pressed, the playing time for the current track is displayed for 5 seconds.
Press `RND' to activate the random function. The unit will play the tracks on the disc in a random* order. `RND' (random) appears in the display while the function is on.
* The random function may cause a disc to be played more than once before playing through all discs.
If you press the CD 3 button, the CD 3 player stops, the sound is switched off and `Pause' appears in the display. Press the CD 3 button again to restart the CD 3 player.
Press the FM or the AM button.
If a cassette is already inserted, you can return to tape mode by pressing the `TAPE' button.
If the CD 3 player has been switched off but the cartridge has not been ejected, you can return to the CD 3 mode by pressing the CD 3 button.
If the CD 6 changer has been switched off, you can return to the CD changer mode
by pressing the CD 6 button.
The CD 6 changer, which is available separately, is loaded with a cartridge which can accommodate 6 discs. If no CD 6 changer is connected, pressing the CD 6 button will have no effect.
To operate:
· Slide the lid on the CD changer forward and press the eject button to remove the cartridge.
· Pull out the tray and place the disc on it, label up. Insert the tray into the cartridge.
· Insert the cartridge in the CD changer
in the direction indicated by the arrow on the
top side of the cartridge, and close the cover.
· Remove the discs from the cartridge by pulling out the trays.
Press the `CD 6' button to activate the CD
6 mode. The CD 6 changer will start playing the last disc and track to be played. If the CD
6 changer cartridge is empty, `No Disc' will appear in the display. If a selected disc does
not exist, the disc number and `CD X-00' (X is the disc number) will appear in the display,
and the next disc will automatically be selected.
If there is no cartridge in the CD 6 changer, `No Magazine' will appear in the display.
Press one of the preselect buttons (1-6) to select the disc number required.
The selected disc number and track number will be displayed.
Press the `FF' or `REW' buttons to
search within a track. While the button is pressed,
the playing time for this track is displayed.
Press `NXT' to move forward to the next track, `RPT' to repeat the previous track or turn the manual tuning knob. The selected disc number and track number will be displayed.
When the `FF' or `REW' buttons are
pressed, the playing time for the current track is
displayed for 5 seconds.
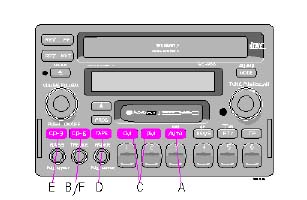
Press `RND' to activate the random function. Randomly selected tracks will play from randomly selected discs. `RND' (random) appears in the display while the function is on.
If you press the CD 6 button, the sound is switched off and `Pause' appears in the display. Press the CD 6 button again to restart the CD 6 changer.
Press the FM or the AM button.
If a cassette is already inserted, you can return to tape mode by pressing the `TAPE' button.
If the CD 3 player has been switched off but the cartridge has not been ejected, you can return to the CD 3 mode by pressing the CD 3 button.
If the CD 6 changer has been switched off, you can return to the CD 6 changer mode
by pressing the CD 6 button.
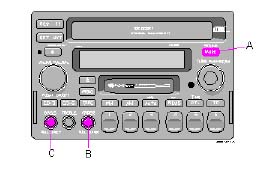
Together with a center speaker mounted at the center of the dash, Dolby Pro Logic Surround Sound offers much clearer and more realistic sound.
Through a connection to a special decoder (optional on certain models), as well as a center speaker (option), the normal left-right stereo channels are divided into left-center-right. In addition, "surround" sound can be created from the car's rear speakers.
Most modern discs are recorded so that vocals are heard in the center foreground, while the orchestra is heard across the entire left-right range, as well as from behind.
Press the `MODE' button to engage the center speaker and the surround unit. The mode selected will be displayed.
"3 CH" = center speaker also engaged.
"Dolby Pro Logic" = Dolby Pro Logic engaged with surround effect from rear speakers *.
First press the button in slightly to pop it
out, then pull the button out completely and turn
it to adjust the volume of the center speaker.
First press the button in slightly to pop it
out, then pull the button out completely and turn
it to adjust the volume level from the rear speakers (Dolby Pro Logic only).
* SC-900 - will not function in AM or FM Radio mode.
SC-901 - will not function in AM Radio mode.
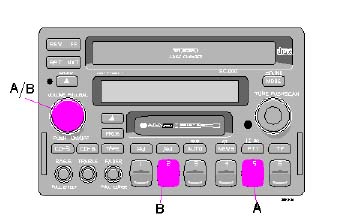
Settings for individual markets are usually adjusted in the factory or at the retailer. If
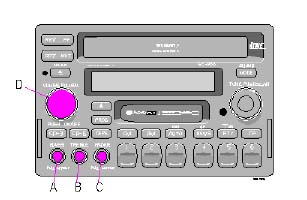
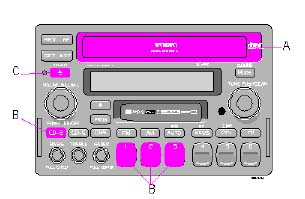
you need to change this setting: switch off the radio; hold down preset button 5 (A); switch
on the radio (A) and press preset button 5 again until the relevant market (US, AUS or
EU) appears.
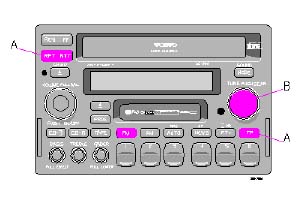
To select the frequency correction:
· Switch off the radio.
· Hold down preset button 2 (B).
· Switch the radio on again.
· Press button 2 until the desired curve appears : S70-V70-S40-V40-Custom.
· Select "Custom EQ" by switching off the radio, holding down preset button 2 and switching the radio again. Select "Custom" (see point B). · Press Scan.
· Press preset button 1-5 within 5 seconds:
Preset button 1 = set bass (60 Hz)
Preset button 2 = set mid-range bass (200 Hz)
Preset button 3 = set lower mid-range (800 Hz)
Preset button 4 = set upper mid-range
(3 kHz)
Preset button 5 = set treble (12 kHz)
· Adjust the setting by turning the Tune knob clocKWise (increase) or counterclocKWise (decrease). The change can be seen in the display, as well as heard.
· Use preset button 6 to adjust the settings of the front or rear speaker.
F = Front
R = Rear
Please note that the equalizer curves can be adjusted separately for the front and rear speakers.
· When you are satisfied with the adjustments you have made, press Scan again to store the settings.
· Press Scan once again to exit the settings mode.
· To select "Custom EQ", press the
Volume knob.
| Output (center speaker): | 1 x 25 W |
| Output (supplementary amplifier): | 4 x 100 W, 10% dist |
| Frequency range: | 30 - 20,000 Hz |
| S/N: | min.74 dB rel. to 1 W |
| Output impedance: | 4 Ohms |
| System voltage: | 12 V, negative ground |
Volvo's SC-901 stereo system contains a microprocessor-controlled radio receiver with PLL (Phase Lock Loop), designed for RDS (Radio Data System). The SC-901 must be connected to a separate power amplifier.
| Frequency range: | |
| AM | 530 - 1710 kHz |
| FM | 87.9 - 107.9 MHz |
| Sensitivity: | |
| AM | 2.2 µV |
| FM | 1.1 µV |
| Stereo separation: | 35 dB |
4-track, 2-channel stereo
Full logic electronic tape transport
| Tape speed: | 4.76 cm/sec. |
| Channel separation: | 40 dB |
| Frequency range: | 30 - 15,000 Hz |
| S/N (120 µV): | 50 dB |
| Wow and Flutter: | < 0.07% |
| Pinch-off |
Alert will be displayed when emergency information is
broadcast. This function is used to warn drivers in the event of a serious
accident or disaster siuation.
· Store cassettes in their cases.
· Do not touch the tape surface with your fingers.
· Tapes should not be exposed to direct sunlight or extreme temperatures.
· Keep tapes away from oil, grease and other contaminants.
· For optimal tape deck performance Volvo does not recommend the use of C-120 tapes.
· Take up slack using a pen or a pencil before inserting a cassette in the cassette slot.
We recommend the use of the Volvo Cleaning Cassette available as a genuine Volvo
accessory. Regular use improves sound quality,
cleans vital parts and prevents tape tangle.
· Before using a new disc for the first time, remove any burrs in the center/outer edge
by running the stem of a pen or similar object around the hole/edge of the disc.
· Use high quality discs only.
· Keep the discs clean. Wipe them with a soft, clean, lint-free cloth, working from the center outwards. If necessary, dampen the cloth with a neutral soap solution. Dry thoroughly before using.
· Never use cleaning spray or antistatic liquid. Use only cleaners specifically made for CD's.
· Use discs of the correct size only (3.5" discs should never be used).
· Do not put tape or labels on the disc itself.
· Volvo does not recommend the use of
plastic outer rings on the disc.
· Condensation may occur on discs/optical components of the changer in cold winter weather. The disc can be dried with a clean, lint-free cloth. Optical components in the CD changer may, however, take up to one hour to dry off.
· Never attempt to play a disc which is damaged in any way.
· When not in use, the discs should be
stored in their covers. Avoid storing discs in excessive heat, direct sunlight or
dusty locations.
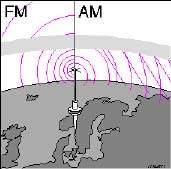
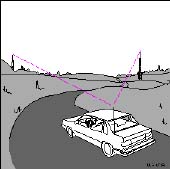
The FM waves do not follow the earth's surface nor do they bounce off the
atmosphere. For this reason their range is limited. The
AM waves follow the earth's surface and reflect against the atmosphere, giving them a
wide range.
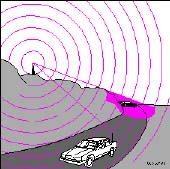
Because of the limited range of the FM senders and the fact that these waves are
very reflective, this problem usually occurs with FM reception. If the sender is blocked
by buildings or mountains, static can result.
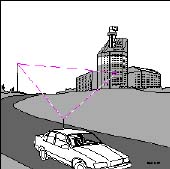
The reason why FM but not AM is audible in covered parking areas, under bridges, etc,
is that FM signals reflect against solid objects such as buildings. Because these waves
are very reflective, static can result. This static
is the result of the reflected signal and the
direct signal reaching your antenna at slightly different times causing a cancellation of
all signals. This problem occurs largely in built-up areas. Your car is equipped with a
dual antenna system which helps alleviate this problem.
If you listen to a weak station in the
vicinity of a stronger one, both stations may be received simultaneously. If the car is moved
a short distance, the weaker signal may be heard more clearly.
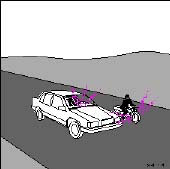
FM is affected by the electrical systems of nearby vehicles, especially those without suppression. The distortion increases if the station is weak or poorly set.
The FM reception is not as sensitive to electrical disturbance as AM.
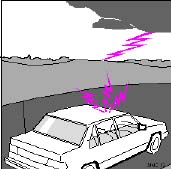
AM reception is sensitive to electrical disturbances such as power lines,
lightning, etc.
Stereo reception places very high demands on the signal quality which means the type of distortions previously mentioned become even more obvious. The signal strength needs to be stronger for good stereo reception and this limits the effective range of the sender.
We hope that this information proves to be useful and provides you with a better understanding of the problems related to car radio reception.
Reception conditions are not always optimum and this is, of course, beyond our control.
However, we have endeavored to make the Volvo Audio System of a quality that will enable you to enjoy the best possible reception no matter what the reception conditions may be.
NOTE: Always lower the antenna when using an automatic car wash or entering a garage.
The antenna should be cleaned at least every 15,000 miles (24,000 km) or more frequently if needed. Use WD40 for cleaning.
Spray the antenna with WD40 and wipe it clean and dry with a rag. Spray it again. Lower and raise the antenna. Wipe it clean and dry again. Lower and raise the antenna 4-6 times.
Make sure it is dry and free from dirt or lubricating oil.
Certain models are equipped with the optional Diversity dual antenna system. Two
antennas are connected to the radio through two separate sockets, allowing for better
reception and reducing the effects of static or
multipath distortion of FM reception.